How to Cut and Light a Cigar: A Beginner’s Step-by-Step Guide
Posted:June 08, 2025
AGE VERIFICATION
The products available on Element Vape are age-restricted and intended
for adults of legal smoking age only. All orders placed on the website will
be verified by an industry leading Age Verification software for validation.
By entering our website, you affirm that you are of legal smoking age in your
jurisdication and you agree to be Age Verified.
The Art Before the Spark
In our previous blog post, we covered the basics of cigar shapes, sizes, and colors. Now, you’ve picked up a few cigars — maybe out of curiosity, or based on a trusted recommendation from a friend or seasoned tobacconist. You’re ready to light up, lean back, and enjoy the moment.
However, you've forgotten that you don’t actually know how to cut or light your cigar.
Before you can sink into the ritual of relaxation, you must remember two things that stand in your way: the cut and the light.
For the uninitiated, cigar cutters and cutting your cigars can be scary. Go too deep, and the cigar will unravel. Don't go deep enough, and the cigar will have a lackluster draw that clogs easily, preventing the glorious smoke from washing over your palate. However, cutting cigars shouldn't be intimidating. Instead, it's part of the ritual, letting users find their personal preference as there is quite a few ways to cut a cigar.
With just a bit of guidance — and a steady hand — you’ll be savoring smooth draws and even burns in no time.
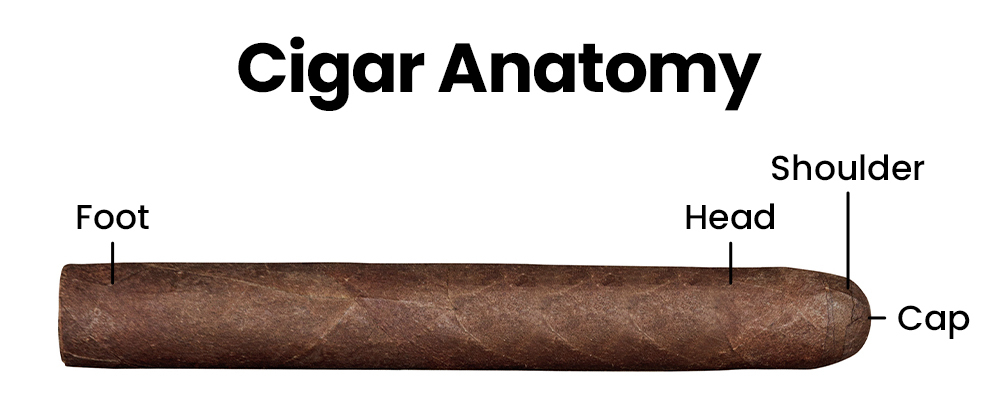
Cigar Anatomy: 4 Key Parts for Cutting and Lighting
Cigars can be surprisingly simple in their anatomy. With just four main parts — the cap, head, shoulder, and foot — understanding their function is essential for anyone looking to cut and smoke properly. Knowing where each part begins and ends will help you make a clean cut, achieve a smooth draw, and fully appreciate the experience.
Let’s break them down:
Cap: The small piece of wrapper leaf that covers the very tip of the cigar. It’s applied during the rolling process to keep the cigar from unraveling. This is the part you’ll be cutting — but not too much. A clean slice just above the shoulder removes the cap while keeping the wrapper intact. Cut too deep and the entire cigar may unravel, making that cigar unsmokeable in its unraveled state.
Head: The closed end of the cigar — the part that goes in your mouth. The cap covers the head. When people refer to “cutting the head,” they usually mean removing the cap from this end.
Shoulder: The curved area where the straight sides of the cigar begin to round off into the head. This is your visual guide for where to place your cut. Aim to cut just above the shoulder, towards the cap, to open the cigar without damaging the structure. If you cut below the shoulder, you risk the cigar unraveling before you can enjoy it.
Foot: The open end of the cigar — this is where you light it. You’ll notice the filler tobaccos are visible here. The foot is typically pre-cut by the manufacturer and does not require any trimming.
Understanding these four parts isn’t just fun cigar anatomy trivia — it’s functional. When you know where to cut (and where not to), you protect the cigar’s integrity and unlock the draw and flavor it was crafted to deliver.
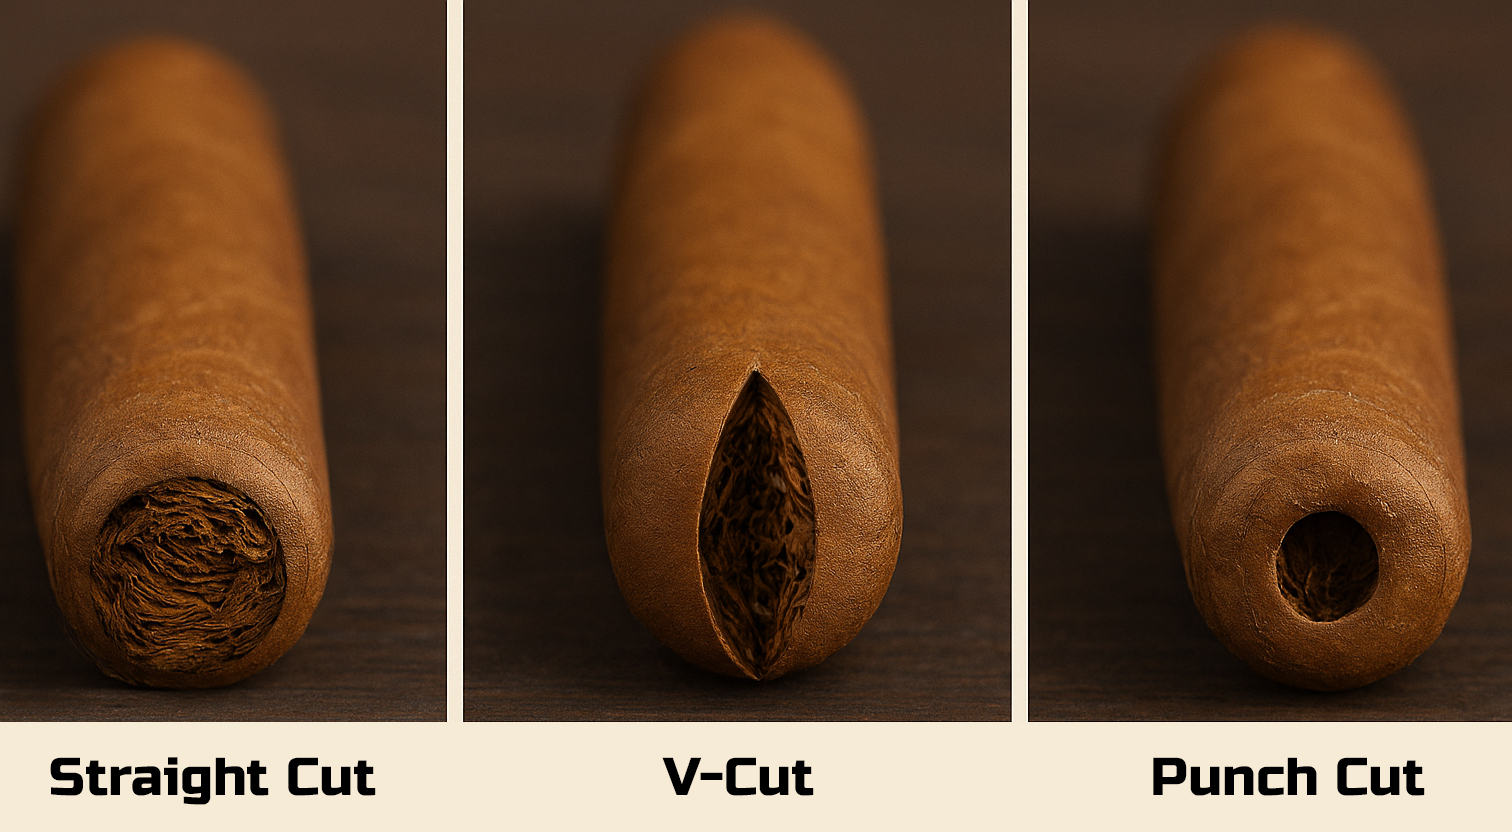
Types of Cuts: How your Cut Changes the Experience
Before you find tools to cut your cigars, lets look at the types of cuts that can be done and how they affect your experience. With three main types, users can find the method that suits the cigar and style of smoking they prefer. The most common cuts are:
Straight Cut: Wide opening that leads to easy draw. Most popular and straight forward. However, cut too deep and the cigar can unravel. In addition, this cut can be messy, letting bits of filler and binder enter the mouth. This type of cut is best for most parejos.
V-Cut: Deep V-shaped notch, some say the funneling shape of the intact cigar will concentrate/intensify the draw. The V-Cut is much cleaner, with less chance of tobacco flakes from falling out. Ideal for larger gauge cigars like parejos or box-pressed cigars. V-Cuts do not work as well on smaller cigars like panatelas or lanceros.
Punch Cut: Small, circular hole that can limit your draw. However, it does keep your cigar's cap intact, eliminating any unraveling worries. Ideal for larger ring parejos, punch cutters are sometimes good for smaller cigars as well, adding a restrictive draw.
Rose/Crown/X Cut: This is bonus cut that I want to mention cause its sort of cool, and is a functional cut. Essentially two V-Cuts, users must rotate the second V-Cut 90° from the first V-Cut, creating an "X" within the head of the cigar.
Each type of cut offers a different experience — from the wide, airy draw of a straight cut to the concentrated intensity of a V-cut or the tidy control of a punch. Your choice depends on the cigar you’re smoking, your personal draw preference, and how you like your flavor delivered. Now that you know what kind of cut you're aiming for, let’s look at the tools that make it happen — and how to use them correctly.
The Tools: How to Achieve Each Cut
Tool
Delivers
Best For
Guillotine Cutter
Straight Cut
Almost all cigars, especially Parejos
V-Cutter
V-Cut
Robustos, Toros, thicker cigars
Punch Cutter
Punch Cut
Firmer, large-ring cigars
Scissors
Mostly Straight
Precision, large cigars
While proper cutters are always preferred, there are a few exceptions — and emergency solutions. For example, pigtailed cigars (those with a twisted nub at the cap) are often designed for simplicity. In a pinch, you can gently tear or rip off the tail with your fingers — no cutter required — and still enjoy a decent draw.
And yes, some old-school smokers bite the cap off. While this rugged method has its place in cigar lore, it’s best reserved for moments of true necessity — like when you’re stuck on a golf course with no tools in sight. Biting risks damaging the wrapper or pulling loose filler into your mouth. If you must do it, be gentle and deliberate, using your front teeth as the cutting blades of a guillotine cutter.
When possible, reach for a cutter. But if you’re caught without these useful cigar accessories, a little know-how (and a light touch) can still get you through the ritual.
Lighting a Cigar: Its Patience, not Pyro!
Choosing the Right Flame
Lighter Type
Notes
Butane Torch
Precise and odorless. Ideal for outdoor use and even burns.
Soft Flame (Match/Bic)
Traditional, elegant, and gentle. Great indoors. Wind can be a challenge.
Cedar Spill
A refined throwback to old-world cigar culture. Burns clean, smells fantastic, and elevates the ritual. A nod to tradition.
Candle, Zippo, BBQ Lighter
Avoid — these use fuels or additives that taint the tobacco’s flavor.
The flame you choose is more than just a tool — it's the first impression your cigar gets. Whether you go for the precision of a butane torch or the elegance of a cedar spill, the right flame respects the cigar’s craftsmanship and sets the tone for the entire experience. Now that you’ve selected your spark, it’s time to learn how to use it with patience and purpose. Up next: the lighting ritual itself — from toasting the foot to that perfect, glowing cherry.
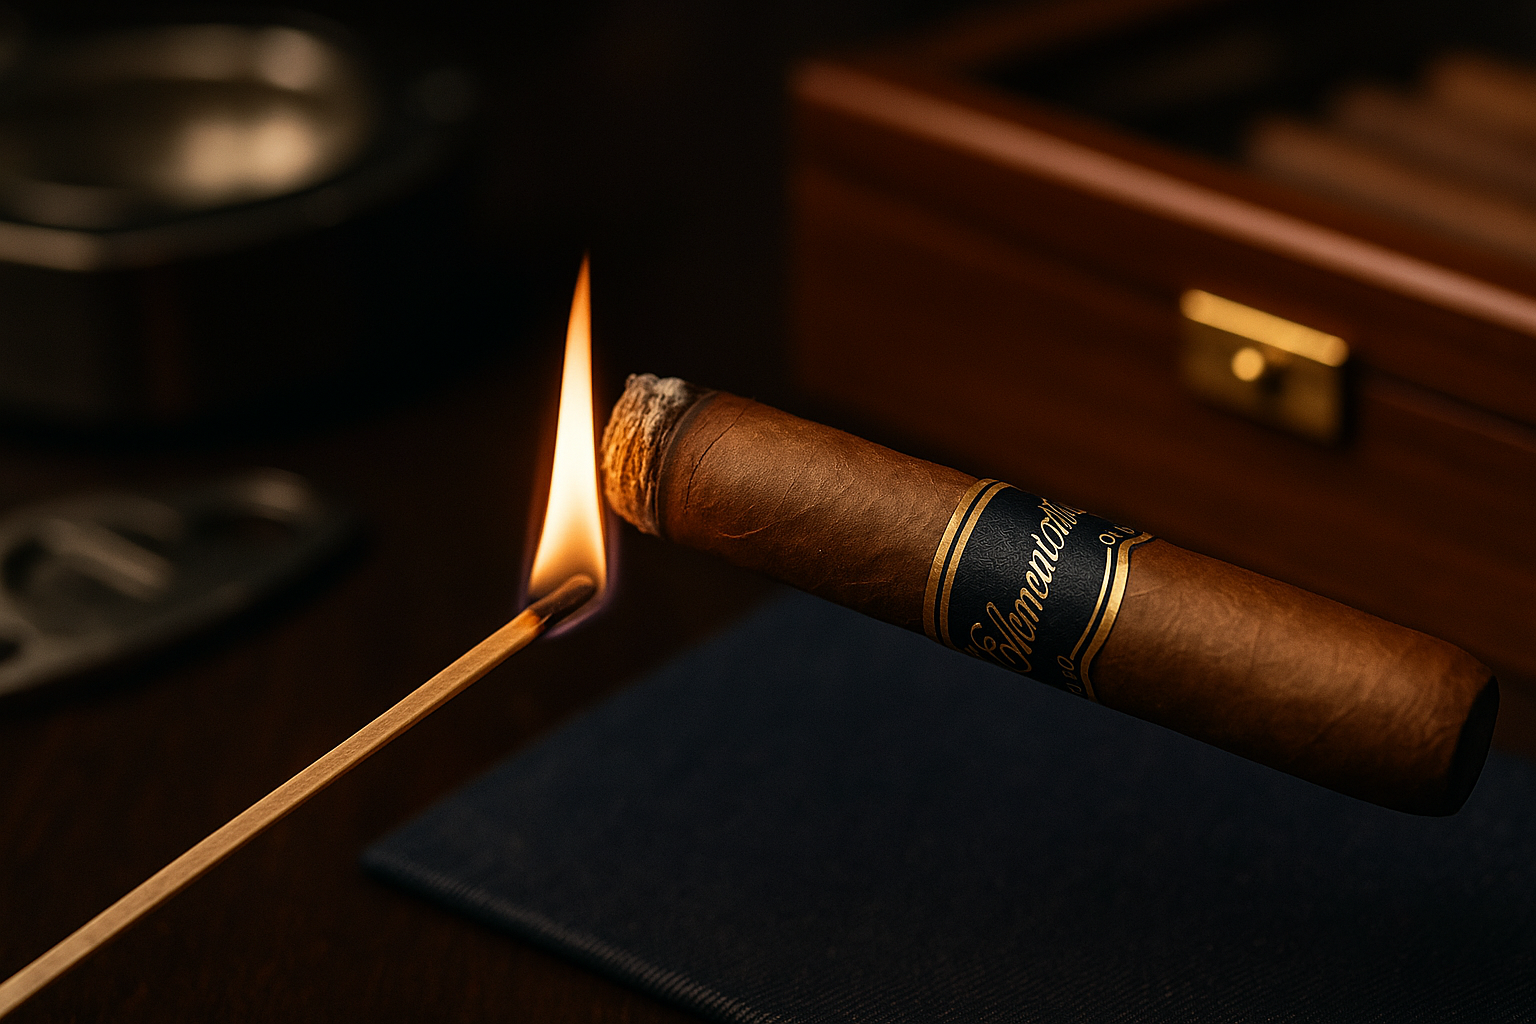
Toasting the Foot
Before the first draw, there’s a quiet moment — a pause where the ritual begins. You’re not lighting a fire; you’re waking a cigar. A gentle toast sets the tone, easing the tobacco into bloom without rushing the process.
Now here’s how to do it right:
Hold the cigar at a 45-degree angle, foot facing down toward the flame.
Keep the flame close, but not touching the cigar — about half an inch away.
Slowly rotate the cigar, allowing the heat to toast the entire circumference of the foot.
Watch for the edges to darken and smolder evenly — they should glow gently, not flare up.
This step may feel subtle, but it’s essential. A well-toasted foot means a cleaner light, a straighter burn, and a far more enjoyable smoke.
Lighting with the Draw
This is the moment where it all begins — the quiet spark that brings the cigar to life. You’ve laid the groundwork with a proper toast. Now, it’s time to seal the ritual with purpose and patience.
Here’s how to light with control and care:
Raise the cigar to your lips and position the foot just above the flame — close enough to feel the heat, but never letting the flame touch the leaf.
Take slow, steady puffs while gently rotating the cigar. This helps draw the heat inward, igniting the filler evenly.
Watch the foot carefully as it glows. You're looking for a bright, even cherry across the entire surface.
If one side falls behind, re-toast gently to balance the burn — but avoid overexposing any area to direct flame.
Remember, you’re not torching a stick — you’re inviting the cigar to open up. A thoughtful light rewards you with symmetry, richness, and that perfect first billow of smoke.
Common Mistakes to Avoid When Lighting a Cigar
Even seasoned smokers occasionally make a misstep — but knowing what not to do can save your cigar (and your pride).
• Cutting too deep → The wrapper may unravel and ruin the structure.
• Lighting too close → Can scorch the wrapper, leading to bitter flavor.
• Puffing too hard → Overheats the tobacco, dulls complexity, and causes harshness.
• Using flavored or chemical flames → Infuses your cigar with unwanted artificial taste.
Slow down. Respect the process. Let the cigar speak for itself.
The Final Puff
Cutting and lighting aren’t just tasks — they’re the opening notes of the cigar experience. The draw, the aroma, the slow unfurling of smoke — it all begins with thoughtful preparation. As you become more comfortable with different cuts and flames, you’ll start to discover the pace and process that feel like your own.
Cigar smoking was never meant to be perfect. It's not a science. It’s meant to be present. It's meant to be artful. It’s about slowing down, tuning in, and savoring every nuance with intention.
So whether you're striking a match or lighting a torch, using a punch or a deep V — remember, this isn’t just a step. It’s your ritual. Make it meaningful to you.
New to Cigars?
Learn how to balance temperature and humidity like a pro to preserve, age, and properly store your cigars.


 Uwell
Uwell RAZ
RAZ SMOK
SMOK Geek Vape
 Vaporesso
 Geek Vape
 SMOK
SMOK UWELL
UWELL


 FOGER
FOGER Lost Mary
 FASTA Vapes
 Fifty Bar
 Juice Head E-Liquid
 Pod Juice
 Monster Vape Labs
 Naked 100
 Lost THC
 Flying Monkey
 BOUTIQ
 ELF THC
 YoCan
YoCan Lookah
 Dr. Dabber
 PuffCo
 OEO
OEO NIQ
NIQ VELO
VELO MELTA
MELTA MJ Arsenal
 Puffco
 GRAV Labs
 EYCE
EYCE Cohiba
 Arturo Fuente
 Davidoff
 My Father
 Nitecore
 Hohm Tech
 UWELL
UWELL LUCY
LUCY